


Leaderboard
-

JPA
Bloggers9Poäng2 220Antal inlägg -

Hipshot
Administrators8Poäng35 571Antal inlägg -

MKJ
Bloggers7Poäng11 381Antal inlägg -
pfrep
Bloggers6Poäng3 510Antal inlägg
Popular Content
Showing content with the highest reputation on 2014-12-29 in all areas
-
 5 pointsSluta prata om bojkott och snälla sluta med hatet mot media, de som är för en stark vargstam vi jägare som inte hatar rovdjur. Med allt detta hat gynnar ingen, framför allt inte oss jägare. Jag hatar inga djur hatar inte vargen, nu kommer det troligen att komma en massa påhopp om att jag inte är en äkta jägare jag har ingen hund jag bor i storstad, fel och åter fel, jag bor i ett samhälle på ca 500 pers jag har jakthund som är min bästa vän, jag anser mig vara äkta jägare. Visst jag respekterar de som inte vill ha varg men kan ni då acceptera mina åsikter? eller måste man vara PK i jägarled då det gäller rovdjuren? Jag lämnade JRF då jag tycker att dom lägger för stor fokus på vargfrågan. Sen anser jag även att de senare förslagen som kom om VVO var vansinne. ÅTERIGEN JAG VILL ATT DET SKA VARA VARG JAKT I LANDET: MEN INTE UTROTA VARGEN. ÄR JAG EN SÄMRE JÄGARE FÖR DET:5 points
 -
4 points
-
2 pointsDen där inställningen har jag aldrig hajjat.. varför måste en art "tillföra" ngt för att få existera? Det pekar på en rätt märklig inställning till natur och djur i största allmänhet.2 points
-
 2 points
 -
 Återkopplar i denna tråd, först kan anges att jag har jaktat en del med pangen, det blev både första och tionde viltet på Gotland som fälldes med den, senast i lördags morse blev det ett par harar med fina skott på lite lagom håll, jag skulle tro att båda två är mycket ätbara utan att vara sönderslagna. Dock är det som så att jag hade 1 tändhattsgenomslag på en av hylsorna och ett par andra som verkligen ser ut som skit, således känns det som att jag efter den kommande helgens tävling i Trelleborg får se till att lämna in pangen för byte av stiften. En helt annan uppföljnings sak är den att med denna pang blir svingen och skotten väldigt kontrollerade på både markvilt och fågel, den ena haren jag sköt i lördags hade jag aldrig nypt med någon av mina tidigare hagelvapen. /CHristian2 points
 -
2 pointsHen kan ju ta sig an det här på två sätt. När hen har fått reda på vilka som jagar på marken så kan ju hen säga till dom att det är slutjagat för er här nu. Som hen har rätt till och jaga själv på marken. Alternativt så kan ju hen använda sin mark till att gå med i jaktlaget. Det är ju upp till var och en.2 points
-
 2 pointsNågot av en sällskapsresa, hjortjakt i England. Dov eller kron, trevligt, gemytligt och viltrikt.2 points
 -
 1 point9) Remove ejector trip rods The ejector trip rods don't actually need to be removed but I recommend it highly. Just push them backwards toward the rear of the receiver with a punch from the front until you can pull them out with your fingers or pull them out with a punch in the slot. The trip rod channels get filthy and need to be cleaned out and the rods themselves should be cleaned and re-lubed. The trip rods may also need to be polished and/or re-bent. Neither of my trip rods was bent quite right from the factory and they were binding in their channels excessively. The trip rods should be snug in their channels but still fairly easy to push back and forth with your finger or a punch. The trip rods are pushed forward by the hammer upon firing and backwards by the forearm when you open the gun after firing. Excessive binding of the trip rods can contribute to misfires by retarding hammer speed and also make the gun harder to open. I re-bent my trip rods (made them a little straighter) and sanded them smoother until they moved back and forth in their channels much easier. This may be one reason why I never get misfires. Don't go nuts bending the trip rods, small changes make a big difference so make a little bend, re-install in the gun and test for smoothness. 10) Clean parts to be reused Thoroughly clean and, if necessary, polish/smooth any parts to be reused (probably just the hammers, hammer spring guides and trip rods) This shows the old and new parts for comparison: 11) Clean receiver I clean my receiver by squirting it with a lot of drugstore alcohol, cleaning out all holes with alcohol soaked Q-Tips or a little electric razor cleaning brush, scrubbing everything with a toothbrush and then blowing all the remaining gunk out with a blower attachment on an air compressor. 12) Reassemble in reverse order using new parts and lube as appropriate The only tricky parts are installing the hammer pins and hammer springs. Hammer pins: Test install both hammer pins, on the right and left sides, to make sure they thread smoothly and go all the way in. My right side pin hole must have had a defect in the threads because it was extremely difficult to screw the new pin all the way in. The old pin was also hard to screw out or in. I cleaned the threads up and new pins now go in smoothly. Note: if your pins do not screw all the way in smoothly be careful not to ding up the screwdriver slot in the pin since it might bind in the slot in the trip rod. It is a good idea to buy 4 pins in case you have a problem and need a spare. Once your hammer pins screw in properly, install the ejector trip rods and hammers. Then push the trip rods in/out until the round section of the slot lines up perfectly with the hammer pin hole. Then visually line up the hole in the hammer with the hammer pin hole. Then push the hammer pin into the receiver hole until it stops at the inside threaded portion of the hammer pin hole. Usually the hammer must be pushed/wiggled as you insert the hammer pin until the pin goes all the way through the hammer itself. The sears tend to get in the way and need to be pushed with a finger. Once the pin is pushed through the hammer hole you can then screw it all the way into the threads until it bottoms. Then back the hammer pin out about a half turn until the flat sides of the top of the pin line up with the slot in the trip rod. Then you can push the trip rod forward. The pin is now loose in the threads but cannot turn because the trip rod slot holds the pin in alignment. When you are installing the hammer and hammer pins, lube the hole in the hammer and the shaft of the hammer pin with a film of grease. Hammer springs: This is the hardest part but easy once you get used to it. The problem is that the hammer springs must be compressed so you can push the tip of the spring guide rod into the recess in the hammer. First put the hammers in their fired position. Then insert just the guide rod into the hole at the rear of the receiver and insert the tip of the guide rod into the hammer recess. This is super easy and shows you how the guide rod fits. Now simply repeat this operation with the hammer spring installed on the guide rod. This will take most people a few tries because compressing the spring is a little difficult and everything tends to slip. Some folks use needle-nose pliers to grip the tip of the guide rod and push it into the recess on the hammer but I like to use an old screwdriver with U-shaped slot filed in it. The only other point I should mention is that when installing the firing pin retainer pins, note that the firing pins have cutouts that must oriented properly so the retainer pins will go in their holes. And obviously don't forget the spring that goes on the lower firing pin. Push the retainer pins in as far as they will go by hand then tap them in flush with the receiver surface using a small punch and hammer. Top pin goes in from the left side and bottom pin goes in from the right side. Once the receiver is back together I lightly oil the moving parts, heavy oil on the main parts and light oil on the trigger parts. I also put a little grease on the hammer/sear contact surfaces. Oil/grease brands are pretty much a matter of personal preference. Any decent gun oil/grease will work fine. Wipe off any excess oil/grease with a Q-Tip, put the stock/recoil pad back on and you are done. Good shooting!1 point
 -
1 pointJag har köpt på mig lite valnöt från staterna eftersom de har varit i desperat behov av pengar. Priserna är sjukt låga och det är många som är desperata... Om någon är intresserad så kan jag skaka fram namnet på han jag köpte av för det är ett beprövat kort! Han sålde ut sina bästa bitar han hade sparat i åratal på eBay och han kanske har några kvar?1 point
-
 1 pointFör ett fint kolv + framstocks arbete så får man nog räkna med 15 - 25.000 kr. Sen tillkommer priset för kolvämnet. Vill man ha t.ex. monogram eller skeletondetaljer så blir det lite mer. Jag vill även rekommendera Gävle kolvmakeri, Rolf Ekeberg. Men han har lite väntetid. Vad som är ett lämpligt "grundämne" kan säkert andra här inne svara på bättre än mig. Merkel har nämnts. Sauer och AYA kanske kan vara alternativ. Ska du satsa på ett custombygge, så välj en baskyl som är relativt diskret (men snygg). Inte så svulstig gravyr. "Less is more" kan man väl säga.1 point
 -
 Smäller det finns ju ingen anledning till byte....1 point
 -
 1 point
 -
1 pointNej Foffe, du är klockren. Vi ska ha varg, få men friska, och denna process kommer att ta tid. Däremot så kan jag tycka att Media är rätt äckliga i detta så en sund skepticism gentemot dem är enbart av godo.1 point
-
Klokt! Är endå bara kaffepengar för ett sådant ingrepp1 point
-
 1 point
 -
 Hej A.J Jag har en Fauve men jag bor i Småland, kan varmt rekommendera rasen om du väljer jaktlinjer då du väl önskar att jaga. Tips kolla Hemsidan. www.fauveklubben.se. Och posta inlägg om att följa med på jakt i ditt område. Annars kan du anmäla till intro drevprov, där man kan följa med och se hur ett drevprov går till med Fauvar i arbete. Tyvärr har nog alla tre intron varit under 2014. Hälsningar Fredric1 point
 -
 1 point"Försök komma med i jaktlaget"? Öhhh... Hen är ju lagfaren ägare som vill ta kontroll över marken!1 point
 -
 1 pointSista episoden har börjat! Ny vecka med nya friska röster. http://www.extremehuntress.com/vote/ 5 röster från mig o fam. på Erika.1 point
 -
1 pointHalvträff på en tidigare eller bom vet fan inte o nu dog en skabbis.. Sent from my iPhone using Tapatalk1 point
-
1 point
-
 1 pointAtt anlägga ett gäng musåtlar kan nog vara en bra idé,. Räv och mård uppskattar det..men jag tror inte att vare sig varg eller Björn bryr sig om så små bytesdjur..1 point
 -
1 pointNu har Zlatan skjutit sin första älg. 500 kg tung i Åre. http://www.expressen.se/sport/fotboll/ligue-1/zlatan-skot-sin-forsta-alg--under-julhelgen/1 point
-
1 pointI min värld så har man framförhållning med ammunitionen till hagel och då är inte den lokala tillgången så viktig, men visst är det trevligt att veta att handlaren i byn ändå har ett sortiment hemma i kaliber 20 Jag har svårt att se att jag skulle gå tillbaka till kaliber 12 om det inte var en ny sportbössa för smidigare kaliber och med i princip samma prestanda får man nog leta efter! För fågeljakten finns det alltid en ledig plats för kaliber 28 men det är jag inte ensam om... Skulle jag lägga några större pengar på en SBS så skulle jag satsa på ett sidolås men eftersom vi bor i ett u-land vad gäller hagelvapen så är inte tillgången så stor, och det är absolut inget fel med boxlås, och skall du ändå stocka om bössan så skall du satsa på vad du tycker är bäst för dig - inte vad vi andra tycker - för det är du som skall ha bössan resten av livet och då går funktion före fabrikat. Jag har ju en opel gissar jag på med min Merkel, men den skjuter som en Aston Martin i mina händer och mer begär jag inte1 point
-
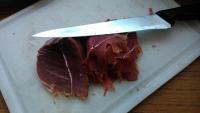
1 pointJapp, nu har man fått ta del av första kallrökningsobjektet, en saltad rådjursbog som fick bo i röken i nästan två dygn med både alrök och äppelträrök... This is da shit! OK, man måste nog vara förtjust i stark röksmak, nu är ju jag det så det är inget problem. Efter rökningen har bogen hängt på en krok i källaren och luktat gott, typ en vecka. Bogen får 6 tomhylsor av 5 möjliga!
 1 point
 -
1 pointNu kan skytte inte läras ut - bara läras in, men inlärning underlättas onekligen dramatiskt om man har ngn som kan leda en bit på lärdomens stig...... /T1 point
-
 1 pointJag satte ut 9 mårdfällor igår,, och 6st idag! Mycke mårdspår på markerna jag ska ut med 30st till i veckan!:-)1 point
 -
 Det finns i Italien en " tävlingsform " med stort inslag av betting där man skjuter på Champangeflaskor, och tekniken är gammal men man måste behärska den . Självklart så funkar den på vilt på 100+ och jag har själv sett det på en skammad Viggand på 100+ ( jag kunde mäta m laser) där det tog tid att få ut båten och hinna fram för en traditionell avfångning på vattnet. Den typen av ammo är vad jag vet förbjuden att sälja i sverige över disk, men den säljs i Italien. Jag ska för ovan ändamål göra ett gäng då jag kan använda dom över öppet vatten utan risk. OBS: jag kommer inte lära ut tekniken offentligt på laddavdelnigen ! / P1 point
 -
80? Glöm det, en på 20 kanske blir på plats.. Max.. Sent from my iPhone using Tapatalk1 point
This leaderboard is set to Stockholm/GMT+02:00